I feel like getting Ruby on Rails up and started is kinda difficult, especially for Linux herp-derps like me. I will start by saying that I kinda suck at Linux, so it took me a while to set up Ruby on Rails. But eventually I found a procedure that will work! I'll keep things short and simple, since you probably just want Ruby on Rails up and running ASAP!
We're going to do [pretty much] everything from the terminal. So one thing to keep in mind is, I'm going to use "yum" since I use Fedora, but if you use Debian, Ubuntu, or Mint, you would use "apt-get" in place of all the times I used "yum". The easy way to do this is, if one of them didn't work, then try the other!
I read online that all the kool katz these days use this thing called RVM to manage their Ruby versions, so I decided to hop on the bandwagon and do it too (and so should you).
Now, enough talking... open the Terminal and let's get started. The important stuff will be in red, so you can ignore all of my noobish comments. Every line that starts with a $ means that you type everything after the $ into the terminal, and every time you you do a "sudo yum install" it will ask for your password (so type that in when prompted) and ask if it's OK to install stuff (so type "y" to confirm).
Step 1: Update your pre-existing packages
$ sudo yum update
Step 2: Install curl
$ sudo yum install curl
Step 3: Install RVM
$ \curl -L https://get.rvm.io | bash -s stable
Step 4: Load RVM
$ source ~/.rvm/scripts/rvm
Step 5: Install dependencies
$ rvm requirements
That should print out a bunch of crap, but we're only interested in the stuff immediately after "# For ruby:" under "Additional Dependencies." I don't know if it'll be verbatim when you're reading this, but as of now, that's how it goes.
Copy all of the stuff after "sudo yum ..." until the end of the paragraph and paste it into the current line in the Terminal, and then press [ENTER]. This could possibly take some time.
Step 6: Install Ruby and set a default version
The current version as of now is 2.0.0, but it might be different, so do a Google search to find out what version we're currently at.
$ rvm install 2.0.0
$ rvm use 2.0.0 --default
This part might take some time... so go play Intergalactic Exterminator while you wait, since that's what I did.
Step 7: Install RubyGems
$ rvm rubygems current
Step 8: Install Rails
$ gem install rails
This part also might take some time, so go ahead and beat another few levels in Intergalactic Exterminator. When you beat the game, the installation should be finished [for a while, probably].
Yay! You're done. But you might have run into some errors. One of the errors I remember that came up was the sqlite3 problem.
Step 9: Fix Errors (i.e. Google search)
So here's how you fix that particular error (blue text for possibly important):
$ sudo yum install sqlite-devel
$ sudo yum install ruby-devel
$ gem install sqlite3
A good way to check if "rails" is installed/working is typing the following command. You should get some version number like 3.2 or something. It might not be the exact same when you're doing it, but it's 3.2 right now for me.
$ rails -v
Now you can use Terminal and navigate to the folder you want to put your first Ruby on Rails program in. If you don't know what I mean, read up (i.e. do a Google search) on the cd command. Now you simply type (of course replace "<project-name>" with the name of your project):
$ rails new <project-name>
After that, it's all up to you where you want to go! I'd say you should look at what a scaffold is since it makes starting up quickly very easy. Don't forget to cd into your project's folder!
Step 10: One last thing - Starting RVM automatically with Terminal
Now one thing I found rather frustrating was that whenever I closed terminal, I couldn't use "rails" in Terminal anymore, unless I typed the following command:
$ source $(rvm 2.0.0 do rvm env --path)
Which is really annoying to do every time. So I did what any rational human would do -- I did a Google search. Took a little bit, but I was able to scrape enough information to come up with a solution!
$ gedit ~/.bashrc
A text-editing program should open up. Add one line to this file containing the following:
source $(rvm 2.0.0 do rvm env --path)
Now, every time you open terminal, you are able to just do "rails" stuff right off the bat! Neat!!!
Well, I hope this was able to help you. If it was, then it's probably because I'm a complete amateur (right now, at least) in doing stuff on Linux, so I have to keep it simple (and without complex explanations that make no sense to noobs like me anyway). I feel like if I had these step-by-step instructions, it would have saved me quite some time and frustration in getting Ruby on Rails set up and ready.
Showing posts with label Learn. Show all posts
Showing posts with label Learn. Show all posts
Saturday, March 2, 2013


Sunday, January 20, 2013
Ruzzle Solver
So today, my friend challenged to a game called "Ruzzle." He claimed that it was a new popular game that everyone was playing. I've never heard of it, so I decided to check it out.
It turns out it's just a relabeled Scramble with Friends, which was popular around a year ago. I find it quite funny that a game can resurface like this, just under a new name. There's no new content, except for advertisements.
Around a year ago, when my friend first introduced me to Scramble with Friends, it was sort of fun, but I figured out something very important: I suck at the game! So, I did as any normal person would do. I got sick and tired of always losing to my friend. I decided to go for the fame and the glory. I made a bot.
Now, I decided to write a blog post (which I haven't done in quite some time) because I uploaded it to MediaFire, where I store all my uploaded files. Since I'm slightly OCD about this, I want everything on MediaFire to be linked with something on this blog. (And perhaps because I wanted to share this awesome secret with other people, although I'm sure that there are other Ruzzle solvers out there.)
Anyway, what this program does is find all of the words in the puzzle and output them, sorted from highest to lowest in letter count. It doesn't take into account the "Double Word Score" or "Triple Letter Score" bonuses, but I imagine if you just type the longest words, they'll contain most of these bonuses anyway. And they are huge freakin' words so they'll still give you massive points, right?
Most of my released programs are pretty "refined," or at least look like they are finished and and don't have random buttons and stuff lying around, but I decided to just leave this one in it's current state. Needless to say, don't press the buttons that have weird names -- even I'm not sure what they do anymore.
To use this is extremely simple:
It turns out it's just a relabeled Scramble with Friends, which was popular around a year ago. I find it quite funny that a game can resurface like this, just under a new name. There's no new content, except for advertisements.
Around a year ago, when my friend first introduced me to Scramble with Friends, it was sort of fun, but I figured out something very important: I suck at the game! So, I did as any normal person would do. I got sick and tired of always losing to my friend. I decided to go for the fame and the glory. I made a bot.
Now, I decided to write a blog post (which I haven't done in quite some time) because I uploaded it to MediaFire, where I store all my uploaded files. Since I'm slightly OCD about this, I want everything on MediaFire to be linked with something on this blog. (And perhaps because I wanted to share this awesome secret with other people, although I'm sure that there are other Ruzzle solvers out there.)
Anyway, what this program does is find all of the words in the puzzle and output them, sorted from highest to lowest in letter count. It doesn't take into account the "Double Word Score" or "Triple Letter Score" bonuses, but I imagine if you just type the longest words, they'll contain most of these bonuses anyway. And they are huge freakin' words so they'll still give you massive points, right?
Most of my released programs are pretty "refined," or at least look like they are finished and and don't have random buttons and stuff lying around, but I decided to just leave this one in it's current state. Needless to say, don't press the buttons that have weird names -- even I'm not sure what they do anymore.
To use this is extremely simple:
- Type the letters on each line into the only TextBox without spaces, so just go from left to right, and then from top to bottom, as the prompt suggests. There should be 16 letters in the TextBox when you're done, and nothing else.
- Press "Go!!!" and a Notepad (or whatever your default text editor is) should pop up, containing the aforementioned list of words.
- Input them into the game as fast as you can.
- Win games.
UPDATE: For some reason or another, I recently updated it to have three output options (you can check any or all of them). The link at the bottom is also updated.
- Sort: outputs the sorted list, as it used to
- Tile: outputs the words for each tile as a starting location, starting with the top-left one, going across and then down. Each sub-list is sorted on word length.
- Filter (5+): same as "Tile" except that it only includes words that are 5 letters or longer to reduce the clutter when going down the list, since there's no way to input all the words in only two minutes.
Have fun beating all your friends at Ruzzle. It's easy to trick them into thinking you're a pro at this game! I've done it twice now!
Just follow the link to download the file. Extract it and run the executable. It's easy as that!
Wednesday, January 5, 2011
Simplified English
Right now, English is one of the most complicated languages because it is so non-standard. If someone asked you to pronounce a word, you may or may not be able to do it because English pronunciations are so weird. However, if you only took a week of Spanish, you could pronounce every single word in that language. Chinese used to be very complex, too. But they simplified it down from Traditional to Simplified Chinese. Too bad it's still kind of complex, although their pronunciations in pin-yin are very easy to read.
Here's a famous question: How to you pronounce "ghoti"? The answer is the same way you pronounce "fish." As in enough, women, nation. How strange! It's no wonder kids have so much trouble learning spelling and speaking.
I think English should be simplified to be a phonetic language, or as close to one as possible. For starters, the letter "C" should be entirely removed from the alphabet. It only serves one purpose: to make the "CH" sound, which maybe should get it's own character. Or, it can just stay and become one of those rarely-used letters like "j", "q", "x", and "z". Maybe "KH" can be used to substitute for the old "CH" sound.
"G" will lose it's soft sound, which is when it sounds like a "J". The "G" should GO let the "J" do it's own JOB! That way, there will be less confusion.
The vowels can still retain their hard and soft sounds, but they should get an accent, a bar, or some other tone marking to show that it is a hard sound (or soft sound -- which ever occurs less in the English language... I'll have to ask a professional language guy).
Now, the alphabet can also be changed to something I called "Simplified English." All the letters are still the same, but now they look different. All of them can now be drawn in one stroke -- no more lifting the pen to dot your "I"s or cross you "T"s. However, if accents are added, it may present a problem because accents would need another stroke. Since it's so standard now, all characters are drawn from top to bottom (or left to right if the endpoints are at the same height, as in the case of the capital letter "A"). They also take less ink to write. Have a look:

As much as I hate to admit it, there are some faults to this. Since the letters are more minimalist, it can sometimes be harder to distinguish between letters. That means the already-messy handwriting for some will become a total disaster in Simplified English. Of course, there can be some slight alterations, such as the curling of the tails on the "g" and "y", but overall, I'd say the letters can't change much. Also, this system has rather poor compatibility with math because the "B" now looks like "3", the "I" and "l" both look like "1", the "O" looks like a "0", and the "Z" looks like a "2". Also, a system in the English language already exists to make writing faster and supposedly easier: cursive.
However, the biggest problem with this whole idea is that change is difficult. The entire world now basically speaks English -- it's the Earth's planetary language now! If aliens came down and asked what language we all spoke, we'd probably say English. So that means we'd have to effect that massive change on basically everyone. I remember some talk about creating a universal language a while ago, but it didn't go through. Obviously, some people didn't feel the need or desire to learn another new language. Revising the English language is probably more difficult than reforming Chinese because many people are learning English as their second language, which means they have to re-learn a language they are currently learning. On the other hand, everyone in China spoke Chinese, so they all changed their first language, which was probably easier for them. It also was not on a global scale.
Another problem of converting to an entirely phonetic language is that there are a ton of homophones in English. These are words that sound the same, so they are only distinguished by their different spellings. Now, all the homophones will combine into one spelling, making it probably a bit more difficult to figure out what certain text is actually saying. People will need to be more adept readers who can use context clues to figure out what meaning of the word it actually is.
Even though this whole idea is pretty preposterous, you should try writing in Simplified English sometime. After reading this through, try reading the first paragraph in Simplified English (an accent means that it is a hard vowel sound):
Rít now, Inglish is won of thé móst komplex lánguijes békuz it is só non-standerd. If sumwon askd yú tú prónows a werd, yú má or má not bé abl tú dú it békuz Inglish prónowséáshins ar só wérd. Howevr, if yú ónlé tuk a wék of Spanish, yú kud prónows evré singul werd in that lánguij. ...
It was so hard just to translate those few sentences from English to Simplified English -- I didn't even write out the new characters and it was still a massive pain. New "Simplified English Keyboards" might have to be made so that accents are easier to type (the Spaniards would surely love that!). Now that kind of thing would stop people from even trying to learn it. I don't even know if I translated it 100% correct. I probably left out an accent here or there or broke one of the rules.
Even though I think this is a pretty good idea for an idealized world (or a very small population), it has no place in the real world. It's just cool to think about it. What do you think? Would it be a good idea to switch to Simplified English?
Here's a famous question: How to you pronounce "ghoti"? The answer is the same way you pronounce "fish." As in enough, women, nation. How strange! It's no wonder kids have so much trouble learning spelling and speaking.
I think English should be simplified to be a phonetic language, or as close to one as possible. For starters, the letter "C" should be entirely removed from the alphabet. It only serves one purpose: to make the "CH" sound, which maybe should get it's own character. Or, it can just stay and become one of those rarely-used letters like "j", "q", "x", and "z". Maybe "KH" can be used to substitute for the old "CH" sound.
"G" will lose it's soft sound, which is when it sounds like a "J". The "G" should GO let the "J" do it's own JOB! That way, there will be less confusion.
The vowels can still retain their hard and soft sounds, but they should get an accent, a bar, or some other tone marking to show that it is a hard sound (or soft sound -- which ever occurs less in the English language... I'll have to ask a professional language guy).
Now, the alphabet can also be changed to something I called "Simplified English." All the letters are still the same, but now they look different. All of them can now be drawn in one stroke -- no more lifting the pen to dot your "I"s or cross you "T"s. However, if accents are added, it may present a problem because accents would need another stroke. Since it's so standard now, all characters are drawn from top to bottom (or left to right if the endpoints are at the same height, as in the case of the capital letter "A"). They also take less ink to write. Have a look:

As much as I hate to admit it, there are some faults to this. Since the letters are more minimalist, it can sometimes be harder to distinguish between letters. That means the already-messy handwriting for some will become a total disaster in Simplified English. Of course, there can be some slight alterations, such as the curling of the tails on the "g" and "y", but overall, I'd say the letters can't change much. Also, this system has rather poor compatibility with math because the "B" now looks like "3", the "I" and "l" both look like "1", the "O" looks like a "0", and the "Z" looks like a "2". Also, a system in the English language already exists to make writing faster and supposedly easier: cursive.
However, the biggest problem with this whole idea is that change is difficult. The entire world now basically speaks English -- it's the Earth's planetary language now! If aliens came down and asked what language we all spoke, we'd probably say English. So that means we'd have to effect that massive change on basically everyone. I remember some talk about creating a universal language a while ago, but it didn't go through. Obviously, some people didn't feel the need or desire to learn another new language. Revising the English language is probably more difficult than reforming Chinese because many people are learning English as their second language, which means they have to re-learn a language they are currently learning. On the other hand, everyone in China spoke Chinese, so they all changed their first language, which was probably easier for them. It also was not on a global scale.
Another problem of converting to an entirely phonetic language is that there are a ton of homophones in English. These are words that sound the same, so they are only distinguished by their different spellings. Now, all the homophones will combine into one spelling, making it probably a bit more difficult to figure out what certain text is actually saying. People will need to be more adept readers who can use context clues to figure out what meaning of the word it actually is.
Even though this whole idea is pretty preposterous, you should try writing in Simplified English sometime. After reading this through, try reading the first paragraph in Simplified English (an accent means that it is a hard vowel sound):
Rít now, Inglish is won of thé móst komplex lánguijes békuz it is só non-standerd. If sumwon askd yú tú prónows a werd, yú má or má not bé abl tú dú it békuz Inglish prónowséáshins ar só wérd. Howevr, if yú ónlé tuk a wék of Spanish, yú kud prónows evré singul werd in that lánguij. ...
It was so hard just to translate those few sentences from English to Simplified English -- I didn't even write out the new characters and it was still a massive pain. New "Simplified English Keyboards" might have to be made so that accents are easier to type (the Spaniards would surely love that!). Now that kind of thing would stop people from even trying to learn it. I don't even know if I translated it 100% correct. I probably left out an accent here or there or broke one of the rules.
Even though I think this is a pretty good idea for an idealized world (or a very small population), it has no place in the real world. It's just cool to think about it. What do you think? Would it be a good idea to switch to Simplified English?
Tuesday, January 4, 2011
LaTeX
I found out about LaTeX last year (oh wait -- 2009's two years ago now!). It's similar to Word in that it makes typed documents, but it's really not the same.
Microsoft Word is a WYSIWYG (What-You-See-Is-What-You-Get) program, meaning that whatever is currently displayed on the screen is exactly what you're getting. If you hit the print button, it will print out the document for you, as it is shown on the screen.
However, LaTeX is like programming. You type in "code" that tells the program what kind of document to create and what text, pictures, and other stuff to include in it. Then, you "build" your document, similar to compiling code in a programming language like C#. It can output to several different file formats, but I prefer the PDF because it is so universal and widely used.
There are a few advantages of this:
Now that you're totally excited and want to try this out, you probably want to know how to get it on your computer! Luckily, it's really easy.
First, download and install MiKTeX, which includes all the files you'll need to format these documents and build them from the ground up. I recommend going to http://miktex.org/ and downloading the latest version. You can either get the Basic or Complete setup. It's barely worth mentioning due to the obviousness, but the Basic setup will take less time to install than the full thing. NOTE: Remember what folder you installed MiKTeX to because you'll need to reference that folder later!
Now that you have the files that form the backbone, we need some User Interface. TeXnicCenter was created to work with MiKTeX and make your job as easy as possible. Go to http://www.texniccenter.org/resources/downloads to download it, and again, get the latest stable version.
This one should install pretty quickly, so just follow the prompts. When it's done, run the program, and it will give you a wizard to help you set it up. It will ask for the location of the executables, so go to your install folder to MiKTeX, and find the a folder called "miktex". In that folder, there's another folder called "bin". Copy the entire address of this folder and put it into the prompt for the path to the executable files. You can leave everything else blank.
If you screw up, then you can just open up TeXnicCenter and go to "Build" --> "Define Output Profiles..." (or Alt + F7), and click "Wizard..." at the bottom-left corner of the dialog window that pops up. Now you can try again!
After you set it up correctly, it's all yours to play with. First, you should change the dropdown menu to say "LaTeX => PDF" unless you want to build to some other format. I like to rearrange the toolbars so that they only take up 2 rows at the top. Then, I close the "Navigator" on the left side so I can have more screen space. It's all up to you to do what you want to make it as nice as possible. You might want to play with the options in the "Tools" menu.
Now you can create your first document. I recommend that you start with this as a template, since LaTeX needs a few things before you can actually type out your stuff. Here's the code that you can use:
\documentclass[12pt,letterpaper]{article}
\usepackage[margin=2.5cm]{geometry}
\begin{document}
\title{}
\author{}
\maketitle
\end{document}
In the blank line, you can start typing out your document. You can put your title in the brackets after "\title" and your name in the brackets after "\author". If you don't want a cool, fancy header, you can just delete the lines between (but not including) "\begin{document}" and "\end{document}".
Now you have to build an output file. Just go to the "Build" menu and then use the things there. A few nice shortcuts are [Ctrl + Shift + F5] to build and view the output, [F7] to just build the file, and [F5] to just view the output.
That was just a very brief introduction to the world of LaTeX. I'm not a complete pro at this, but I'll probably make a post in the future about how to do the basics.
Have fun making professional-looking PDF documents now!
Microsoft Word is a WYSIWYG (What-You-See-Is-What-You-Get) program, meaning that whatever is currently displayed on the screen is exactly what you're getting. If you hit the print button, it will print out the document for you, as it is shown on the screen.
However, LaTeX is like programming. You type in "code" that tells the program what kind of document to create and what text, pictures, and other stuff to include in it. Then, you "build" your document, similar to compiling code in a programming language like C#. It can output to several different file formats, but I prefer the PDF because it is so universal and widely used.
There are a few advantages of this:
- The document after it is processed appears much more professional, and uses advanced typesetting algorithms and such. For example, if there are two "f" letters in a row, they are supposed to be connected. Of course, Word doesn't do this for you, but LaTeX will.
- Although you can make Word documents into PDFs, it's not automatic whereas PDF files can be opened anywhere. The code can be edited with a simple text editor, such as the feature-empty Notepad that comes with Windows.
- You can even use online compilers, (just Google : "Online LaTeX Compiler"). That means you can do your stuff anywhere you want.
- LaTeX is designed especially for writing professional-looking reports, including scientific ones. As such, processing code for math typesetting (like the fraction bar, nested radicals, and Greek letters).
- You're learning how to use a handy tool that you might have to use when you go to college (or whenever you do professional science work).
Now that you're totally excited and want to try this out, you probably want to know how to get it on your computer! Luckily, it's really easy.
First, download and install MiKTeX, which includes all the files you'll need to format these documents and build them from the ground up. I recommend going to http://miktex.org/ and downloading the latest version. You can either get the Basic or Complete setup. It's barely worth mentioning due to the obviousness, but the Basic setup will take less time to install than the full thing. NOTE: Remember what folder you installed MiKTeX to because you'll need to reference that folder later!
Now that you have the files that form the backbone, we need some User Interface. TeXnicCenter was created to work with MiKTeX and make your job as easy as possible. Go to http://www.texniccenter.org/resources/downloads to download it, and again, get the latest stable version.
This one should install pretty quickly, so just follow the prompts. When it's done, run the program, and it will give you a wizard to help you set it up. It will ask for the location of the executables, so go to your install folder to MiKTeX, and find the a folder called "miktex". In that folder, there's another folder called "bin". Copy the entire address of this folder and put it into the prompt for the path to the executable files. You can leave everything else blank.
If you screw up, then you can just open up TeXnicCenter and go to "Build" --> "Define Output Profiles..." (or Alt + F7), and click "Wizard..." at the bottom-left corner of the dialog window that pops up. Now you can try again!
After you set it up correctly, it's all yours to play with. First, you should change the dropdown menu to say "LaTeX => PDF" unless you want to build to some other format. I like to rearrange the toolbars so that they only take up 2 rows at the top. Then, I close the "Navigator" on the left side so I can have more screen space. It's all up to you to do what you want to make it as nice as possible. You might want to play with the options in the "Tools" menu.
Now you can create your first document. I recommend that you start with this as a template, since LaTeX needs a few things before you can actually type out your stuff. Here's the code that you can use:
\documentclass[12pt,letterpaper]{article}
\usepackage[margin=2.5cm]{geometry}
\begin{document}
\title{}
\author{}
\maketitle
\end{document}
In the blank line, you can start typing out your document. You can put your title in the brackets after "\title" and your name in the brackets after "\author". If you don't want a cool, fancy header, you can just delete the lines between (but not including) "\begin{document}" and "\end{document}".
Now you have to build an output file. Just go to the "Build" menu and then use the things there. A few nice shortcuts are [Ctrl + Shift + F5] to build and view the output, [F7] to just build the file, and [F5] to just view the output.
That was just a very brief introduction to the world of LaTeX. I'm not a complete pro at this, but I'll probably make a post in the future about how to do the basics.
Have fun making professional-looking PDF documents now!
Monday, January 3, 2011
SparkNotes Compiler-Extractor
Ever find yourself in an English class in which the the text you're supposed to read is borderline incomprehensible? Or if you're "that guy" who always needs to read supplement texts AFTER reading the original to make sure you have complete mastery of what you were supposed to read?
Either way, you probably read the SparkNotes. Maybe you want to print them out and bring them to school so you can have a look at them in class. Maybe your teacher is so magnanimous that he/she lets you use your notes on tests and/or quizzes.
If you fall in any of those categories, then you can find use in the SparkNotes Compiler/Extractor. (If you're in middle school, you might not need this, but once you get into high school, SparkNotes will become your good friend, especially if you take higher-level English courses. Or if you're just completely lazy.) This way, you don't have to manually copy-and-paste the text (and waste a lot of time) for every SparkNotes page for every book that you're supposed to be reading.
I'd say that this program is pretty self-explanatory, but I'm the one who wrote it, so I'd think it's easy to use no matter what, right? Here's a quick run-through of how to use the program. You might want to just download and try the program first, and come back and read the rest of this post if you don't get it.
When you download the file ("SparkNotes Compiler-Extractor.zip"), you should extract the ZIP archive to wherever you want. In your unzipped folder, you should have 6 items (in no particular order):
Either way, you probably read the SparkNotes. Maybe you want to print them out and bring them to school so you can have a look at them in class. Maybe your teacher is so magnanimous that he/she lets you use your notes on tests and/or quizzes.
If you fall in any of those categories, then you can find use in the SparkNotes Compiler/Extractor. (If you're in middle school, you might not need this, but once you get into high school, SparkNotes will become your good friend, especially if you take higher-level English courses. Or if you're just completely lazy.) This way, you don't have to manually copy-and-paste the text (and waste a lot of time) for every SparkNotes page for every book that you're supposed to be reading.
I'd say that this program is pretty self-explanatory, but I'm the one who wrote it, so I'd think it's easy to use no matter what, right? Here's a quick run-through of how to use the program. You might want to just download and try the program first, and come back and read the rest of this post if you don't get it.
When you download the file ("SparkNotes Compiler-Extractor.zip"), you should extract the ZIP archive to wherever you want. In your unzipped folder, you should have 6 items (in no particular order):
- SparknotesCompiler.cs -- This is the source code for the program. You can open it, read it, change it, and basically do anything you want with it except sell it!
- c_SparknotesCompiler.bat -- Run this file to compile SparknotesCompiler.cs if you make any changes to the source code.
- SparknotesCompiler.exe -- This is the actual program. Run this program.
- SparkNotes.dotx -- This is a word template I created just for these SparkNotes. You just open the HTM document generated by Sparknotes.exe, copy all the text, and paste it into this template. There's more to it, so read on.
- SparkNotes.bas -- This is a Word macro for fixing up the formatting in your document. You'll find out more about this further down the post.
- styles.css -- This CSS file is needed for the generated HTM files to display correctly. NOTE: The HTM files that are generated must be put in the same folder as the styles.css file!
Now you can compile/extract a SparkNotes! First, run SparknotesCompiler.exe. The first prompt wants you to complete a URL. Let's compile Heart of Darkness by Joseph Conrad, for example. To get SparkNotes's URL for that certain book, just Google it: "SparkNotes Heart of Darkness". Probably the first one will be a link to it. You can either click it or just use the web address that you see: "www.sparknotes.com/lit/heart". All you have to fill out is the end of this URL, so type into the program: "lit/heart" and press [ENTER].
NOTE: If you get a URL like "http://www.sparknotes.com/lit/heart/section1.html", then just take out anything after the book's (probably abbreviated) name in the URL. Also, don't include the forward-slash at the end, like the program tells you in case you didn't read it because you don't like to follow directions.
If you're just a normal user, then I recommend you just leave all the files extracted in the same folder, meaning that you shouldn't move them around and separate them. You can move the entire folder if you want, just not the individual files. That way, it helps keeps styles.css in the same folder as your HTM files.
When the program prompts you for a name, you should just enter the name without a path, such as "Heart of Darkness" or "Heart of Darkness - Conrad" or something like that. Do not include the ".HTM" extension at the end; only put in the name. Any characters not allowed in a normal file name are not allowed here. The program will crash if you try something funny.
Now the program will start listing a whole bunch of URLs that it has finished getting the data from. It'll tell you how long it took. If you want to view the generated file right now, then press [ENTER] when the program is done (and gives you the prompt). Otherwise just close it and maybe look at your SparkNotes later.
If you want a Word document version, then you have to do some work yourself (don't worry, it's pretty easy -- I already did most of it for you!). First, you open up a new document based on SparkNotes.dotx by double-clicking it. Then, you copy and paste in the text from your HTM document. Remember to paste in the good-looking stuff that you normally read, not the HTML source code. I'd fix up the formatting at the top a bit so that the book's title and author's name take up less space, but that's just my personal preference. Next, you should change the name in the header (on the second page) to display the correct book title and author name in the corresponding places.
Here's something you might learn now: Word macros. If you don't know what they are, it's OK because I already made it for you. Because this post is already so long, I won't post the actual code here.
Here are the instructions for Word 2007. If you have a different version of Word, it's probably pretty similar. First, go to "View' on the ribbon and click "Macros" --> "View Macros" on the right. Or, Alt - W - M - V is the Office 2007 shortcut for you. Then, type in the name of the macro we're going to use. For this one, I recommend something like "SparkNotes". Then click the "Create" button. It'll bring up this code screen. But don't be afraid! Click "File" --> "Import File..." and navigate to the folder where this program is. Select "SparkNotes.bas". Save and close the code window and go back to your Word document. Go view your macros again. This time, select "SparkNotes" and click "Run". It will format your document for you. I think that you only have to do this once, because it will save the macro with Word. How useful! You don't have to save this word document with the rest of the HTM files, styles.css, and the other files because Word has it's own independent formatting now. It has no dependencies on other files!
If you're OK with a Word document (which you probably are), then you're fine. If you want to make a PDF out of it, I recommend that you get CutePDF Writer. It's a great, easy-to-install, free tool. You can save/move the PDF files anywhere you want, just like the Word documents. Just remember to keep the 6 downloaded files and the generated HTM files together!
That's all... it was pretty easy, wasn't it? You didn't need those instructions -- you probably think I am insulting your intelligence right now!
If you didn't find the link in that massive bulk of text above, here it is again:
Saturday, January 1, 2011
New Year's Resolutions
Happy New Year's, everyone! Now that 2011 is here, we all are ready to make our resolutions for the new year. Of course, many of us have huge lists that are possible only through divine intervention. However, I think the best idea is a list of 3 items:
- Something you can do for others, such as:
- Volunteering. Many organizations, such as hospitals and children's camps, are in constant need of volunteers. Even though you may not always feel like you're doing a lot, your time and efforts to help the community can really make a difference in someone else's life.
- Forming a club. You and your friends can all start a club around some common interest, such as music, books, or art.
- Being nice to someone. Maybe you should try being nice to your siblings!
- Helping around the house. Your parents would really appreciate it if you would actually help them with the many things that need to be done around the house.
- Saying "please" and "thank you." Manners are always important, and everyone should learn how to be polite. Building those people skills is just as important as building those academic skills.
- Something you can do for yourself, such as:
- Learning something new. Maybe you want to learn how to play an instrument, how to program, or even how to touch type.
- Getting organized. If you're a messy person, maybe this is the year to change that bad habit. You may also want to consider keeping a calendar (electronic or paper both work) so that you will know when stuff happens.
- Using correct spelling and grammar. It's kind of annoying (and makes you look dumb) if you're past middle school and you don't know "how 2 spel or uzing kurekt gramar."
- Building a good habit. These habits are either your best friends or worst enemies, depending on whether it's a good or bad habit. You might want to remember to turn off your lights this year. Or eat breakfast every day. Or drive safely. Or be on time.
- A long-term project. Do something you've always wanted/needed to do before. You could renovate the house or finish the basement. You could learn to build a computer. You could read a book series. The possibilities are endless!
- "I will follow through on my New Year's Resolutions." Or something similar. Everyone has such great goals for themselves, but it's so sad that a very small percentage of them go through. It's almost a ritual: January - create resolutions, February - stop doing resolutions, March - forget resolutions, April - wait until next year to set new ones. Maybe doing 2 smaller things each year every year is better than having a gargantuan list all to be done in one year!
Friday, December 31, 2010
Learning to Type
I only learned how to touch type (typing without looking at the keyboard) when I was in high school. I used to type at a decent speed (~40 words per minute), but it was only after I learned how to touch type that I could raise that up to 80 words per minute.
If you have to do a lot of typing, such as writing reports for school, programming, or even casually blogging, typing quickly is extremely valuable. The faster you can get your ideas down, the more time you have to do other things. It is really annoying when you have so many good ideas, but you took so long typing that you forgot what you were going to write.
I first learned to type when I was in 10th grade. I took AP World History, which had a lot of homework that involved reading the book and taking notes on it. Usually, it ended up as a 1 - 2 page note-sheet. Of course, I could read and process much faster than I could type, so my typing speed was definitely the bottleneck for my homework completion rate.
I decided that I would learn how to type faster. This is the part where most people stop trying to learn, because your typing speed drops dramatically in the first few weeks. Right when I decided to switch over from random typing to touch typing, I probably had only 15 - 20 word per minute. Yes, that's very slow! I had to constantly remind myself to keep on typing correctly, because once I stop thinking about touch typing, I would automatically revert to looking down at the keyboard and typing with random fingers again. Since I typed so slowly at first, it took much longer to do my homework.
However, I could see improvement after a while. My speed began picking up. After a few days, I could type without looking at the keyboard, but I still had to sometimes stop and think about where certain keys were. After a week or two, I could type just as fast as I used to be able to. After around a month, it became habit. I could touch type without a problem. My typing speed doubled!
If you don't know how to touch type, then I think you really should. It really helps a lot, especially after I learned how to program. If you're extra-awesome, maybe you want to learn how to type with a Dvorak Keyboard, which has better key layouts for faster typing with fewer errors because it requires less finger movement by placing the important keys in the middle row.
If you have to do a lot of typing, such as writing reports for school, programming, or even casually blogging, typing quickly is extremely valuable. The faster you can get your ideas down, the more time you have to do other things. It is really annoying when you have so many good ideas, but you took so long typing that you forgot what you were going to write.
I first learned to type when I was in 10th grade. I took AP World History, which had a lot of homework that involved reading the book and taking notes on it. Usually, it ended up as a 1 - 2 page note-sheet. Of course, I could read and process much faster than I could type, so my typing speed was definitely the bottleneck for my homework completion rate.
I decided that I would learn how to type faster. This is the part where most people stop trying to learn, because your typing speed drops dramatically in the first few weeks. Right when I decided to switch over from random typing to touch typing, I probably had only 15 - 20 word per minute. Yes, that's very slow! I had to constantly remind myself to keep on typing correctly, because once I stop thinking about touch typing, I would automatically revert to looking down at the keyboard and typing with random fingers again. Since I typed so slowly at first, it took much longer to do my homework.
However, I could see improvement after a while. My speed began picking up. After a few days, I could type without looking at the keyboard, but I still had to sometimes stop and think about where certain keys were. After a week or two, I could type just as fast as I used to be able to. After around a month, it became habit. I could touch type without a problem. My typing speed doubled!
If you don't know how to touch type, then I think you really should. It really helps a lot, especially after I learned how to program. If you're extra-awesome, maybe you want to learn how to type with a Dvorak Keyboard, which has better key layouts for faster typing with fewer errors because it requires less finger movement by placing the important keys in the middle row.
Wednesday, December 29, 2010
FarmVille Bot
FarmVille is this "popular" game on Facebook. In a nutshell, you're a farmer, and you just have to plant and harvest crops to level up. It's a surprisingly addicting game. However, the one turnoff is that it takes so long to individually click each field (those who play the game know what I'm talking about). It can take up to 30 minutes if you have a large enough farm.
This program uses several of the C# classes I posted on my blog earlier:
C# Mouse
C# InputBox
C# FileSystemDialog
It also a class I made up for this program called the Location class. If you want to look at it, then just download the source code (at the bottom of this post).
I developed a pretty easy to use tool for working on your farm (it works best if you have just a massive square of fields). Refer to the image below:

What you have to do is tell it how many rows and columns of fields it has to work on and where the four corners of the rectangular region you want to harvest are. TOP means the top-most field, LEFT means the left-most field, RIGHT means the right-most field, and BOTTOM means the bottom-most field. I'm pretty sure you could have figured that one out. To set these values, you have to select one of the boxes, and press space when your cursor is over the respective field. The program will automatically rotate the selection counterclockwise, so I recommend starting at the TOP box and then going LEFT, BOTTOM, and RIGHT. Also, I think it's best that you go to the market and select any crop so that you have your actually mouse pointer when you're setting these values.
The program will not click on the field indicated in the exceptions box. Click "Add" to add an exception to the field given by the row and column in the rectangular region. Keep in mind that the left-most field is at row and column 0 (ZERO). For example, you'd use this to skip over the square that my guy is standing in at the center. By the way, it's best that you fence in your character using hay bales so that he doesn't have to walk over to the fields to work on them. It saves a lot of time.
Just hit the "Go!" button to begin the operation! Watch as the program does all the work for you. However, you can't minimize the FarmVille window until the program is done clicking on all the fields. If it misses a few fields, you can probably click them yourself and then tweak the corner locations later. If it totally fails, then you can just minimize the FarmVille window (or show desktop using the Windows Key + D) and then try again.
In the File menu, you can save your farm. The program will automatically load the file called "Default.fvm" if it exists, so you are going to do the same farm over and over again, save it as "Default.fvm." You can also load existing farms. Also, just in case you forgot to save your farm, it creates a file called "LastFarm.fvm" automatically. It will be overwritten the next time you exit the program, so make sure that rename this file to something else if you want to keep it. Keep in mind that the program can only read and write .FVM files.
A hint to those who have irregularly shaped farms (that aren't rectangular or square). You should divide your farm into as few rectangles as possible, and make a save file for each of those rectangles.
You can download the program here ("FarmVille Master.exe").
You can also get the C# source code here ("FarmVille Master.zip").
Have fun winning at FarmVille!
This program uses several of the C# classes I posted on my blog earlier:
C# Mouse
C# InputBox
C# FileSystemDialog
It also a class I made up for this program called the Location class. If you want to look at it, then just download the source code (at the bottom of this post).
I developed a pretty easy to use tool for working on your farm (it works best if you have just a massive square of fields). Refer to the image below:

What you have to do is tell it how many rows and columns of fields it has to work on and where the four corners of the rectangular region you want to harvest are. TOP means the top-most field, LEFT means the left-most field, RIGHT means the right-most field, and BOTTOM means the bottom-most field. I'm pretty sure you could have figured that one out. To set these values, you have to select one of the boxes, and press space when your cursor is over the respective field. The program will automatically rotate the selection counterclockwise, so I recommend starting at the TOP box and then going LEFT, BOTTOM, and RIGHT. Also, I think it's best that you go to the market and select any crop so that you have your actually mouse pointer when you're setting these values.
The program will not click on the field indicated in the exceptions box. Click "Add" to add an exception to the field given by the row and column in the rectangular region. Keep in mind that the left-most field is at row and column 0 (ZERO). For example, you'd use this to skip over the square that my guy is standing in at the center. By the way, it's best that you fence in your character using hay bales so that he doesn't have to walk over to the fields to work on them. It saves a lot of time.
Just hit the "Go!" button to begin the operation! Watch as the program does all the work for you. However, you can't minimize the FarmVille window until the program is done clicking on all the fields. If it misses a few fields, you can probably click them yourself and then tweak the corner locations later. If it totally fails, then you can just minimize the FarmVille window (or show desktop using the Windows Key + D) and then try again.
In the File menu, you can save your farm. The program will automatically load the file called "Default.fvm" if it exists, so you are going to do the same farm over and over again, save it as "Default.fvm." You can also load existing farms. Also, just in case you forgot to save your farm, it creates a file called "LastFarm.fvm" automatically. It will be overwritten the next time you exit the program, so make sure that rename this file to something else if you want to keep it. Keep in mind that the program can only read and write .FVM files.
A hint to those who have irregularly shaped farms (that aren't rectangular or square). You should divide your farm into as few rectangles as possible, and make a save file for each of those rectangles.
You can download the program here ("FarmVille Master.exe").
You can also get the C# source code here ("FarmVille Master.zip").
Have fun winning at FarmVille!
Monday, December 27, 2010
How to Make V-Darts
"V-darts" are these small paper projectiles shaped like V's (hence the name). They're also called "stingers" because they sting a lot when you get hit.
Of course there are many ways to make them, but the best ones are small and dense. Here's the V-dart that I think is best.
Take a sheet of letter paper and rip it into the 8 pieces according to the diagram below. Remember, ripping paper is a life skill, so if you don't know how, read How to Rip Paper. I recommend doing the rips in the numbered order. (By the way, the relative sizes on the picture are accurate!)

After you tear the paper into those nice eighths, take one of those, make the folds, following the diagram below. In case it's not obvious enough, orient it in the landscape fashion first, fold it the "hotdog" way, and then fold it in half horizontally 4 times.

After you make fold #5 above, you can either fold it in half down the middle ("hamburger" style) or put tape on the ends so that it's stronger and unfolds less when you try to make that final fold down the middle.

Now you have a V-dart! When it's done, it should look something like this:

WARNING: Do not shoot anybody with these. Even though they might not really hurt some people, others think they hurt a lot. Besides, it's always good to be nice! These things are pretty powerful, and when launched of a decent rubber band, they can penetrate packets of 3 or more pieces of paper! Imagine that hitting skin! So don't shoot people!
Of course there are many ways to make them, but the best ones are small and dense. Here's the V-dart that I think is best.
Take a sheet of letter paper and rip it into the 8 pieces according to the diagram below. Remember, ripping paper is a life skill, so if you don't know how, read How to Rip Paper. I recommend doing the rips in the numbered order. (By the way, the relative sizes on the picture are accurate!)
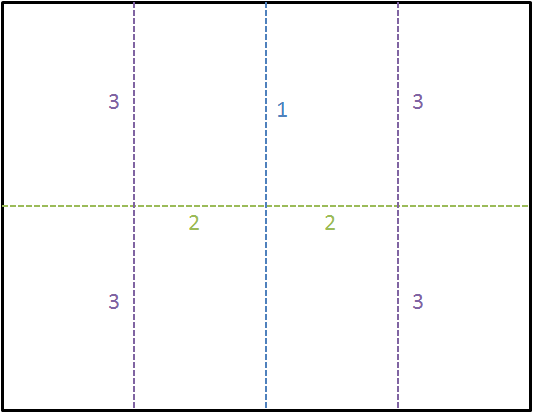
After you tear the paper into those nice eighths, take one of those, make the folds, following the diagram below. In case it's not obvious enough, orient it in the landscape fashion first, fold it the "hotdog" way, and then fold it in half horizontally 4 times.


Now you have a V-dart! When it's done, it should look something like this:

 |
| The back of a packet of 4 sheets after being shot with V-darts |
Thursday, December 23, 2010
C# FileSystemDialog
Now that you know how to read from and write to the hard drive (or if you don't, see C# Read/Write From File), we need a way to get the name of the file to be loaded from or saved to. You could use my C# InputBox, but it's not as professional-looking as this C# FileSystemDialog.
I created this class, which takes two classes already made and puts it into one. It uses the SaveFileDialog and the OpenFileDialog. If you don't remember how to add a class to your project, see (C# InputBox).
The use of this class is pretty self explanatory.
To get the name of a save file, use:
FileSystemDialog.SaveDialog();
It gives you the name of the file or an empty string (as in "") if the user presses cancel.
To get the name of a load file, use:
FileSystemDialog.LoadDialog();
It gives you the name of the file or an empty string if the user presses cancel.
If you want to make an absolute path into a relative path (from the .EXE file), use:
FileSystemDialog.MakePathRelative("full_path");
Obviously you have to replace "full_path" with a string containing the path that you want to make relative.
Finally, after adding this class to your project, you should change the properties (i.e. DefaultExt, Filter, etc.) to the stuff that you want, such as a unique file extension for your save files. In the init() method, Change all the instances of "clk" to your file extension of choice and "Click file" to the name of your type of file. The Title is whatever you want to be displayed at the top of the respective dialog windows.
Here's the code:
using System;
using System.Collections.Generic;
using System.Linq;
using System.Text;
using System.Windows.Forms;
using System.IO;
static class FileSystemDialog
{
private static SaveFileDialog saver;
private static OpenFileDialog loader;
// for the first time the FileSystemDialog methods are called
// change the strings in this method to fit your needs
private static void init()
{
saver = new SaveFileDialog();
loader = new OpenFileDialog();
saver.DefaultExt = "clk";
saver.Filter = "Click file (*.clk)|*.clk";
saver.AddExtension = true;
saver.RestoreDirectory = true;
saver.Title = "Save As...";
saver.InitialDirectory = Directory.GetCurrentDirectory();
loader.DefaultExt = "clk";
loader.Filter = "Click file (*.clk)|*.clk";
loader.AddExtension = true;
loader.RestoreDirectory = true;
loader.Title = "Open...";
loader.InitialDirectory = Directory.GetCurrentDirectory();
}
public static string SaveDialog()
{
if (saver == null) // only when first time
{
init();
}
saver.ShowDialog();
return saver.FileName; // return empty string ("") if cancel button is pressed
}
public static string LoadDialog()
{
if (loader == null) // only when first time
{
init();
}
loader.ShowDialog();
return loader.FileName; // return empty string ("") if cancel button is pressed
}
public static string MakePathRelative(string path)
{
return path.Replace(Directory.GetCurrentDirectory() + "\\", "");
}
}
I created this class, which takes two classes already made and puts it into one. It uses the SaveFileDialog and the OpenFileDialog. If you don't remember how to add a class to your project, see (C# InputBox).
The use of this class is pretty self explanatory.
To get the name of a save file, use:
FileSystemDialog.SaveDialog();
It gives you the name of the file or an empty string (as in "") if the user presses cancel.
To get the name of a load file, use:
FileSystemDialog.LoadDialog();
It gives you the name of the file or an empty string if the user presses cancel.
If you want to make an absolute path into a relative path (from the .EXE file), use:
FileSystemDialog.MakePathRelative("full_path");
Obviously you have to replace "full_path" with a string containing the path that you want to make relative.
Finally, after adding this class to your project, you should change the properties (i.e. DefaultExt, Filter, etc.) to the stuff that you want, such as a unique file extension for your save files. In the init() method, Change all the instances of "clk" to your file extension of choice and "Click file" to the name of your type of file. The Title is whatever you want to be displayed at the top of the respective dialog windows.
Here's the code:
using System;
using System.Collections.Generic;
using System.Linq;
using System.Text;
using System.Windows.Forms;
using System.IO;
static class FileSystemDialog
{
private static SaveFileDialog saver;
private static OpenFileDialog loader;
// for the first time the FileSystemDialog methods are called
// change the strings in this method to fit your needs
private static void init()
{
saver = new SaveFileDialog();
loader = new OpenFileDialog();
saver.DefaultExt = "clk";
saver.Filter = "Click file (*.clk)|*.clk";
saver.AddExtension = true;
saver.RestoreDirectory = true;
saver.Title = "Save As...";
saver.InitialDirectory = Directory.GetCurrentDirectory();
loader.DefaultExt = "clk";
loader.Filter = "Click file (*.clk)|*.clk";
loader.AddExtension = true;
loader.RestoreDirectory = true;
loader.Title = "Open...";
loader.InitialDirectory = Directory.GetCurrentDirectory();
}
public static string SaveDialog()
{
if (saver == null) // only when first time
{
init();
}
saver.ShowDialog();
return saver.FileName; // return empty string ("") if cancel button is pressed
}
public static string LoadDialog()
{
if (loader == null) // only when first time
{
init();
}
loader.ShowDialog();
return loader.FileName; // return empty string ("") if cancel button is pressed
}
public static string MakePathRelative(string path)
{
return path.Replace(Directory.GetCurrentDirectory() + "\\", "");
}
}
As always, you can download it here ("FileSystemDialog.cs").
Tuesday, December 21, 2010
C# Read/Write From File
A lot of the more advanced programs that you will write will require reading from and writing to the hard drive. This basically means saving and loading files for your program.
Most operations involving your hard drive will need the namespace System.IO, so add the following statement to the top of your class:
using System.IO;
To read from your hard drive, using the following line:
string fileText = File.ReadAllText("file_name");
You should replace "file_name" with whatever file you want to read. Remember that you have to include the file extension. The contents of "file_name" will be put into a string called fileText (or whatever you want to call this variable).
To write to the hard drive, use the following line:
File.WriteAllText("file_name", "text");
Again, replace "file_name" with the name of the file you want to save it as, and you still have to include the extension if the file is supposed to have one. "Text" is whatever you want to put into the file. Obviously, you can have a string variable instead of just some text in quotes.
I think that those two methods are the most useful in the System.IO namespace, but if you're still interested in all sorts of the other cool things in the System.IO namespace, see this site:
http://msdn.microsoft.com/en-us/library/system.io.aspx
Most operations involving your hard drive will need the namespace System.IO, so add the following statement to the top of your class:
using System.IO;
To read from your hard drive, using the following line:
string fileText = File.ReadAllText("file_name");
You should replace "file_name" with whatever file you want to read. Remember that you have to include the file extension. The contents of "file_name" will be put into a string called fileText (or whatever you want to call this variable).
To write to the hard drive, use the following line:
File.WriteAllText("file_name", "text");
Again, replace "file_name" with the name of the file you want to save it as, and you still have to include the extension if the file is supposed to have one. "Text" is whatever you want to put into the file. Obviously, you can have a string variable instead of just some text in quotes.
I think that those two methods are the most useful in the System.IO namespace, but if you're still interested in all sorts of the other cool things in the System.IO namespace, see this site:
http://msdn.microsoft.com/en-us/library/system.io.aspx
Saturday, December 18, 2010
How to Rip Paper
Ripping paper is a life skill. Not the kind of ripping where you completely annihilate the piece of paper on these scraggly rips, but the kind of ripping that gives you a clean line where you want it.

Fold it along the line that you want to rip. You have to crease it well, as in running your fingernail, pen cap, or paper clip over the fold two or three times. You don't have to overkill on this. Some recommend wetting the crease with spit or something, but I think that's gross and unnecessary.

Carefully make a small rip along the line at the top of the paper. You might want to hold the paper in the air and slowly make the small rip. Or you could hold it against the desk tightly and pull sideways slowly. Either way, do it slowly and carefully. If your starting point rip is a failure, turn it around and try again on the other side. If both sides are failures, then pick the best side you have and move on. If both sides are epic failures, get a new piece of paper and try again.

The rest is easy. Just rip down crease from the starting point you created!

Now if that's not efficient enough for you, you can try ripping two pieces at a time. It's a bit harder and a lot of this depends on the friction between the pages and the friction between the paper and your surface. I'd say that anything more than three pages is unrealistic and you'd spend more time getting it right than ripping them two or three at a time.

It's pretty much the same as before. Make your crease where you want to rip. This time you have to make sure that the crease is better, especially for the paper on the inside, which you can't really see. Maybe run your creasing tool over it three to four times.

Make that starting rip, but make sure that the rip is good on both pages.

It's not as easy as before, but finishing is still very easy. You might have to press down on the paper harder to make sure that they stay together and both get ripped at the same time. If they fall apart, then you can just rip them separately.

Now you know how to rip paper. It's totally a life skill.
I'm thinking that most people already know how to do this, but maybe I'm wrong. I've seen people who are wholly incapable of making a nice rip, so it's never too late to learn! For the (hopefully very small) minority of people who want to learn how to rip paper correctly, read on! There's even images!
First, find a piece of paper that you want to rip (duh!).

Fold it along the line that you want to rip. You have to crease it well, as in running your fingernail, pen cap, or paper clip over the fold two or three times. You don't have to overkill on this. Some recommend wetting the crease with spit or something, but I think that's gross and unnecessary.

Carefully make a small rip along the line at the top of the paper. You might want to hold the paper in the air and slowly make the small rip. Or you could hold it against the desk tightly and pull sideways slowly. Either way, do it slowly and carefully. If your starting point rip is a failure, turn it around and try again on the other side. If both sides are failures, then pick the best side you have and move on. If both sides are epic failures, get a new piece of paper and try again.

The rest is easy. Just rip down crease from the starting point you created!

Now if that's not efficient enough for you, you can try ripping two pieces at a time. It's a bit harder and a lot of this depends on the friction between the pages and the friction between the paper and your surface. I'd say that anything more than three pages is unrealistic and you'd spend more time getting it right than ripping them two or three at a time.

It's pretty much the same as before. Make your crease where you want to rip. This time you have to make sure that the crease is better, especially for the paper on the inside, which you can't really see. Maybe run your creasing tool over it three to four times.

Make that starting rip, but make sure that the rip is good on both pages.

It's not as easy as before, but finishing is still very easy. You might have to press down on the paper harder to make sure that they stay together and both get ripped at the same time. If they fall apart, then you can just rip them separately.

Now you know how to rip paper. It's totally a life skill.
Saturday, December 11, 2010
C# Mouse
Have you ever wanted to manipulate the mouse cursor programmatically using C#? Well, look no further, because this small Mouse class puts the mouse actions into a nice, small class you can use in your programs.
If you are still wondering what you can do with this simple class, here are a few examples:
Have a look at the code here (although you can download it at bottom of this post):
using System;
using System.Collections.Generic;
using System.Linq;
using System.Text;
using System.Runtime.InteropServices;
using System.Drawing;
using System.Windows.Forms;
static class Mouse
{
private const UInt32 MOUSEEVENTF_LEFTDOWN = 0x02;
private const UInt32 MOUSEEVENTF_LEFTUP = 0x04;
private const UInt32 MOUSEEVENTF_RIGHTDOWN = 0x08;
private const UInt32 MOUSEEVENTF_RIGHTUP = 0x10;
private const UInt32 MOUSEEVENTF_MIDDLEDOWN = 0x20;
private const UInt32 MOUSEEVENTF_MIDDLEUP = 0x40;
[DllImport("user32.dll")]
private static extern void mouse_event(
UInt32 dwFlags, // motion and click options
UInt32 dx, // horizontal position or change
UInt32 dy, // vertical position or change
UInt32 dwData, // wheel movement
IntPtr dwExtraInfo // application-defined information
);
public static void Move(Point p)
{
Cursor.Position = p;
}
public static void Move(int x, int y)
{
Mouse.Move(new Point(x, y));
}
public static void Click()
{
mouse_event(MOUSEEVENTF_LEFTDOWN, 0, 0, 0, new System.IntPtr());
mouse_event(MOUSEEVENTF_LEFTUP, 0, 0, 0, new System.IntPtr());
}
public static void Click(Point p)
{
Mouse.Move(p);
Mouse.Click();
}
public static void Click(int x, int y)
{
Mouse.Click(new Point(x, y));
}
public static void RightClick()
{
mouse_event(MOUSEEVENTF_RIGHTDOWN, 0, 0, 0, new System.IntPtr());
mouse_event(MOUSEEVENTF_RIGHTUP, 0, 0, 0, new System.IntPtr());
}
public static void RightClick(Point p)
{
Mouse.Move(p);
Mouse.RightClick();
}
public static void RightClick(int x, int y)
{
Mouse.RightClick(new Point(x, y));
}
public static void MiddleClick()
{
mouse_event(MOUSEEVENTF_MIDDLEDOWN, 0, 0, 0, new System.IntPtr());
mouse_event(MOUSEEVENTF_MIDDLEUP, 0, 0, 0, new System.IntPtr());
}
public static void MiddleClick(Point p)
{
Mouse.Move(p);
Mouse.MiddleClick();
}
public static void MiddleClick(int x, int y)
{
Mouse.MiddleClick(new Point(x, y));
}
}
Most of the methods are self-explanatory (a.k.a. they do pretty much what the method names would suggest). However, I give some examples anyway:
For each of these lines, assume that somePoint is some Point already defined, such as:
Point somePoint = new Point(13, 37);
Mouse.Move(somePoint); // Moves the cursor to somePoint
Mouse.Move(123, 456); // Moves the cursor to the pixel on your screen at (123, 456)
Mouse.Click(); // Left-click at current cursor position
Mouse.Click(somePoint); // Left-click at somePoint
Mouse.Click(135, 246); // Left-click at the pixel on your screen at (135, 246)
Mouse.RightClick(); // Right-click at current cursor position
Mouse.RightClick(somePoint); // Right-click at somePoint
Mouse.RightClick(147, 258); // Right-click at the pixel on your screen at (147, 258)
Mouse.MiddleClick(); // Middle-click at current cursor position
Mouse.MiddleClick(somePoint); // Middle-click at somePoint
Mouse.MiddleClick(159, 260); // Middle-click at the pixel on your screen at (159, 260)
After reading that, you're probably thinking, Why did I bother reading that? It was so freakin' obvious! Or maybe you were thinking, Why did that guy waste his time posting those examples? Does he think I'm stupid or something?!
Anyway, you can download the C# class here (Mouse.cs).
Note: If you don't remember how to add this class to your C# project, see C# InputBox.
If you are still wondering what you can do with this simple class, here are a few examples:
- Moving the mouse around so the user has no idea what's going on.
- Making a macro (or "bot") for an online game.
- Repeatedly clicking the same thing over and over again.
Many of the programs I will post will be based on this Mouse class!
Have a look at the code here (although you can download it at bottom of this post):
using System;
using System.Collections.Generic;
using System.Linq;
using System.Text;
using System.Runtime.InteropServices;
using System.Drawing;
using System.Windows.Forms;
static class Mouse
{
private const UInt32 MOUSEEVENTF_LEFTDOWN = 0x02;
private const UInt32 MOUSEEVENTF_LEFTUP = 0x04;
private const UInt32 MOUSEEVENTF_RIGHTDOWN = 0x08;
private const UInt32 MOUSEEVENTF_RIGHTUP = 0x10;
private const UInt32 MOUSEEVENTF_MIDDLEDOWN = 0x20;
private const UInt32 MOUSEEVENTF_MIDDLEUP = 0x40;
[DllImport("user32.dll")]
private static extern void mouse_event(
UInt32 dwFlags, // motion and click options
UInt32 dx, // horizontal position or change
UInt32 dy, // vertical position or change
UInt32 dwData, // wheel movement
IntPtr dwExtraInfo // application-defined information
);
public static void Move(Point p)
{
Cursor.Position = p;
}
public static void Move(int x, int y)
{
Mouse.Move(new Point(x, y));
}
public static void Click()
{
mouse_event(MOUSEEVENTF_LEFTDOWN, 0, 0, 0, new System.IntPtr());
mouse_event(MOUSEEVENTF_LEFTUP, 0, 0, 0, new System.IntPtr());
}
public static void Click(Point p)
{
Mouse.Move(p);
Mouse.Click();
}
public static void Click(int x, int y)
{
Mouse.Click(new Point(x, y));
}
public static void RightClick()
{
mouse_event(MOUSEEVENTF_RIGHTDOWN, 0, 0, 0, new System.IntPtr());
mouse_event(MOUSEEVENTF_RIGHTUP, 0, 0, 0, new System.IntPtr());
}
public static void RightClick(Point p)
{
Mouse.Move(p);
Mouse.RightClick();
}
public static void RightClick(int x, int y)
{
Mouse.RightClick(new Point(x, y));
}
public static void MiddleClick()
{
mouse_event(MOUSEEVENTF_MIDDLEDOWN, 0, 0, 0, new System.IntPtr());
mouse_event(MOUSEEVENTF_MIDDLEUP, 0, 0, 0, new System.IntPtr());
}
public static void MiddleClick(Point p)
{
Mouse.Move(p);
Mouse.MiddleClick();
}
public static void MiddleClick(int x, int y)
{
Mouse.MiddleClick(new Point(x, y));
}
}
Most of the methods are self-explanatory (a.k.a. they do pretty much what the method names would suggest). However, I give some examples anyway:
For each of these lines, assume that somePoint is some Point already defined, such as:
Point somePoint = new Point(13, 37);
Mouse.Move(somePoint); // Moves the cursor to somePoint
Mouse.Move(123, 456); // Moves the cursor to the pixel on your screen at (123, 456)
Mouse.Click(); // Left-click at current cursor position
Mouse.Click(somePoint); // Left-click at somePoint
Mouse.Click(135, 246); // Left-click at the pixel on your screen at (135, 246)
Mouse.RightClick(); // Right-click at current cursor position
Mouse.RightClick(somePoint); // Right-click at somePoint
Mouse.RightClick(147, 258); // Right-click at the pixel on your screen at (147, 258)
Mouse.MiddleClick(); // Middle-click at current cursor position
Mouse.MiddleClick(somePoint); // Middle-click at somePoint
Mouse.MiddleClick(159, 260); // Middle-click at the pixel on your screen at (159, 260)
After reading that, you're probably thinking, Why did I bother reading that? It was so freakin' obvious! Or maybe you were thinking, Why did that guy waste his time posting those examples? Does he think I'm stupid or something?!
Anyway, you can download the C# class here (Mouse.cs).
Note: If you don't remember how to add this class to your C# project, see C# InputBox.
Friday, December 10, 2010
Facebook at School (Ultrasurf)
Have you ever wanted to use Facebook (or some other site that was blocked) in school? Look no further, because a company called Ultrareach created a program called Ultrasurf.
Ultrasurf was originally created to stop censorship in China so those people over there could see ideas such as democracy and free labor. See more about their cause here:
http://www.ultrareach.com/background_en.htm
Even though it was created for this noble cause, you can still use it for your own purposes (such as Facebook in school). Basically how it works is that it searches for a fast proxy to mask your IP address.
You can download Ultrasurf here: http://www.ultrareach.com/
More available downloads here: http://www.ultrareach.com/download_en.htm
After you download it, I don't think you even need to extract it from the .ZIP archive, although you could if you want to.
Sometimes, schools might block the Ultrasurf download page. Never fear, because you can use a proxy server (lots of them listed at http://proxy.org/) to download Ultrasurf. You're using a proxy to download a proxy!
Why not just use a proxy server online? Well, many of them have really annoying ads that pop up, most of them cannot render certain pages correctly (especially images), and they're usually pretty slow. Ultrasurf displays all of it correctly and loads the pages very quickly. Plus, Ultrasurf has no ads in it at all.
One more problem... what if you school blocks proxy servers? Then I guess you'll have to bring Ultrasurf on a flash drive after downloading it from your home computer!
Ultrasurf was originally created to stop censorship in China so those people over there could see ideas such as democracy and free labor. See more about their cause here:
http://www.ultrareach.com/background_en.htm
Even though it was created for this noble cause, you can still use it for your own purposes (such as Facebook in school). Basically how it works is that it searches for a fast proxy to mask your IP address.
You can download Ultrasurf here: http://www.ultrareach.com/
More available downloads here: http://www.ultrareach.com/download_en.htm
After you download it, I don't think you even need to extract it from the .ZIP archive, although you could if you want to.
Sometimes, schools might block the Ultrasurf download page. Never fear, because you can use a proxy server (lots of them listed at http://proxy.org/) to download Ultrasurf. You're using a proxy to download a proxy!
Why not just use a proxy server online? Well, many of them have really annoying ads that pop up, most of them cannot render certain pages correctly (especially images), and they're usually pretty slow. Ultrasurf displays all of it correctly and loads the pages very quickly. Plus, Ultrasurf has no ads in it at all.
One more problem... what if you school blocks proxy servers? Then I guess you'll have to bring Ultrasurf on a flash drive after downloading it from your home computer!
Tuesday, December 7, 2010
C# InputBox
A lot of people who start programming might choose Visual Basic because, as the name suggests, it is a rather easy language to learn since there are a lot of words and fewer symbols than other languages like Java and C#. As time goes on and they become better at programming, people might want to switch over to C# because Visual Basic is too verbose or because of C#'s similarity to Java. Or you could just start with C#. Either way, if you're just starting to use C#, you realize there is no built-in way to get input from the user through a dialog box in C#.
So I created my own InputBox. And get this: it has the option of getting multiple responses at once in an array. This is pretty useful for getting multi-parameter things from the user, such as getting the location of a new Point (it's much nicer to have the X and Y coordinate prompt in the same dialog than to have two separate dialogs).
HOW TO ADD NEW CLASSES TO YOUR PROJECT:
To add this class to your C# project, you should click: Project > Add New Item... (or Ctrl + Shift + A). Select a "New Class." Name it "InputBox.cs". Then copy and paste the following code into your new class.
Alternatively, you can download the class (InputBox.cs) and add it to your class: Project > Add Exiting Item (or Shift + Alt + A). Choose the InputBox.cs file you just downloaded.
Basically, Show(...) is an overloaded method that can return an array of values with the same dimensions of your prompt array or return a single value if your prompt is only a single string. Note: the method returns null if the user presses cancel.
Examples:
using System;
using System.Collections.Generic;
using System.Linq;
using System.Text;
using System.Windows.Forms;
using System.Drawing;
static class InputBox
{
public static string[] Show(string[] pars, string title)
{
int size = pars.Length;
Form frmInputBox = new Form();
Label[] labels = new Label[size];
TextBox[] texts = new TextBox[size];
Button btnOK = new Button();
Button btnCancel = new Button();
frmInputBox.Text = title;
frmInputBox.ClientSize = new Size(420, 100 + 40 * (size - 1));
frmInputBox.FormBorderStyle = FormBorderStyle.FixedDialog;
frmInputBox.MinimizeBox = false;
frmInputBox.MaximizeBox = false;
frmInputBox.AcceptButton = btnOK;
frmInputBox.CancelButton = btnCancel;
frmInputBox.StartPosition = FormStartPosition.CenterScreen;
for (int i = 0; i < size; i++)
{
Label l = new Label();
l.Text = pars[i];
l.Location = new Point(10, 10 + 40 * i);
l.AutoSize = true;
labels[i] = l;
TextBox t = new TextBox();
t.Location = new Point(10, 25 + 40 * i);
t.Size = new Size(400, 20);
texts[i] = t;
}
btnOK.Text = "OK";
btnOK.Location = new Point(255, 70 + 40 * (size - 1));
btnOK.DialogResult = DialogResult.OK;
btnCancel.Text = "Cancel";
btnCancel.Location = new Point(335, 70 + 40 * (size - 1));
btnCancel.DialogResult = DialogResult.Cancel;
frmInputBox.Controls.AddRange(labels);
frmInputBox.Controls.AddRange(texts);
frmInputBox.Controls.AddRange(new Control[] {btnOK, btnCancel});
DialogResult dialogResult = frmInputBox.ShowDialog();
if (dialogResult == DialogResult.OK)
{
string[] results = new string[size];
for (int i = 0; i < size; i++)
{
results[i] = texts[i].Text;
}
return results;
}
else
{
return null;
}
}
public static string Show(string par, string title)
{
string[] temp = Show(new string[] {par}, title);
if (temp == null)
{
return null;
}
else
{
return temp[0];
}
}
}
So I created my own InputBox. And get this: it has the option of getting multiple responses at once in an array. This is pretty useful for getting multi-parameter things from the user, such as getting the location of a new Point (it's much nicer to have the X and Y coordinate prompt in the same dialog than to have two separate dialogs).
HOW TO ADD NEW CLASSES TO YOUR PROJECT:
To add this class to your C# project, you should click: Project > Add New Item... (or Ctrl + Shift + A). Select a "New Class." Name it "InputBox.cs". Then copy and paste the following code into your new class.
Alternatively, you can download the class (InputBox.cs) and add it to your class: Project > Add Exiting Item (or Shift + Alt + A). Choose the InputBox.cs file you just downloaded.
Basically, Show(...) is an overloaded method that can return an array of values with the same dimensions of your prompt array or return a single value if your prompt is only a single string. Note: the method returns null if the user presses cancel.
Examples:
string par = InputBox.Show("Give me a number:", "Prompt"); // shows a dialog box for getting a single value in return with the title "Prompt"
string[] pars = InputBox.Show(new string[] {"X:", "Y:"}, ""); // shows a dialog box for getting an X value (will be in pars[0]) and a Y value (will be in pars[1]) without a title because of the empty string in the title parameterHere is the code (sorry the spacing is awkward and the text is so small... it's just so that all code fits on one line... it'll look just fine after you copy and paste it into your C# class):
using System;
using System.Collections.Generic;
using System.Linq;
using System.Text;
using System.Windows.Forms;
using System.Drawing;
static class InputBox
{
public static string[] Show(string[] pars, string title)
{
int size = pars.Length;
Form frmInputBox = new Form();
Label[] labels = new Label[size];
TextBox[] texts = new TextBox[size];
Button btnOK = new Button();
Button btnCancel = new Button();
frmInputBox.Text = title;
frmInputBox.ClientSize = new Size(420, 100 + 40 * (size - 1));
frmInputBox.FormBorderStyle = FormBorderStyle.FixedDialog;
frmInputBox.MinimizeBox = false;
frmInputBox.MaximizeBox = false;
frmInputBox.AcceptButton = btnOK;
frmInputBox.CancelButton = btnCancel;
frmInputBox.StartPosition = FormStartPosition.CenterScreen;
for (int i = 0; i < size; i++)
{
Label l = new Label();
l.Text = pars[i];
l.Location = new Point(10, 10 + 40 * i);
l.AutoSize = true;
labels[i] = l;
TextBox t = new TextBox();
t.Location = new Point(10, 25 + 40 * i);
t.Size = new Size(400, 20);
texts[i] = t;
}
btnOK.Text = "OK";
btnOK.Location = new Point(255, 70 + 40 * (size - 1));
btnOK.DialogResult = DialogResult.OK;
btnCancel.Text = "Cancel";
btnCancel.Location = new Point(335, 70 + 40 * (size - 1));
btnCancel.DialogResult = DialogResult.Cancel;
frmInputBox.Controls.AddRange(labels);
frmInputBox.Controls.AddRange(texts);
frmInputBox.Controls.AddRange(new Control[] {btnOK, btnCancel});
DialogResult dialogResult = frmInputBox.ShowDialog();
if (dialogResult == DialogResult.OK)
{
string[] results = new string[size];
for (int i = 0; i < size; i++)
{
results[i] = texts[i].Text;
}
return results;
}
else
{
return null;
}
}
public static string Show(string par, string title)
{
string[] temp = Show(new string[] {par}, title);
if (temp == null)
{
return null;
}
else
{
return temp[0];
}
}
}
Subscribe to:
Posts (Atom)